Zoom client for meetings has become one of the most popular platforms of online study by almost all the teachers and children. Zoom is available for Windows, macOS, Android, iOS, and many more. Before we come to this point: how to use Zoom. Let’s first understand what the Zoom meeting app is?
What is Zoom Meeting App?
Zoom is a free video-conferencing, web conferencing, webinars, and screen sharing app that helps users to participate in video calls or host the meetings. As in today’s world, most of the parents are still not tech-savvy. So, you might be wondering how to start with zoom. We are providing you a step-by-step process to use the Zoom meeting app on a desktop/laptop so that things become easy for you to understand.
Features of Zoom Meeting App
Easy to Join a meeting
Students can join meetings using a provided link or by entering a meeting ID and password.
Chat
Participants can chat on the Zoom app by clicking the chat option and can ask their queries through chat.
Disable video
As a participant, you can join the meeting with audio only and then turn on the video if asked by the teacher. Teachers can also disable an individual participant’s video.
Nonverbal feedback
These little icons help students to raise a hand if you have a question about something, give a thumbs-up or thumbs-down, and even let the teacher know that they need a break.
Mute/unmute
Participants can mute or unmute themselves if asked by the teacher. Teachers can also mute or unmute them accordingly to maintain peace in the class.
Waiting rooms
It is like a lobby where participants wait after joining until the time teacher admits them one by one in the class.
Participants limit
The free plans allow for up to 100 participants with a duration of a 40-minute video call.
Easy access
You can get meeting access through the Zoom phone app, web browser, or desktop app.
Unlimited meetings
1-to-1 Zoom meetings are unlimited.
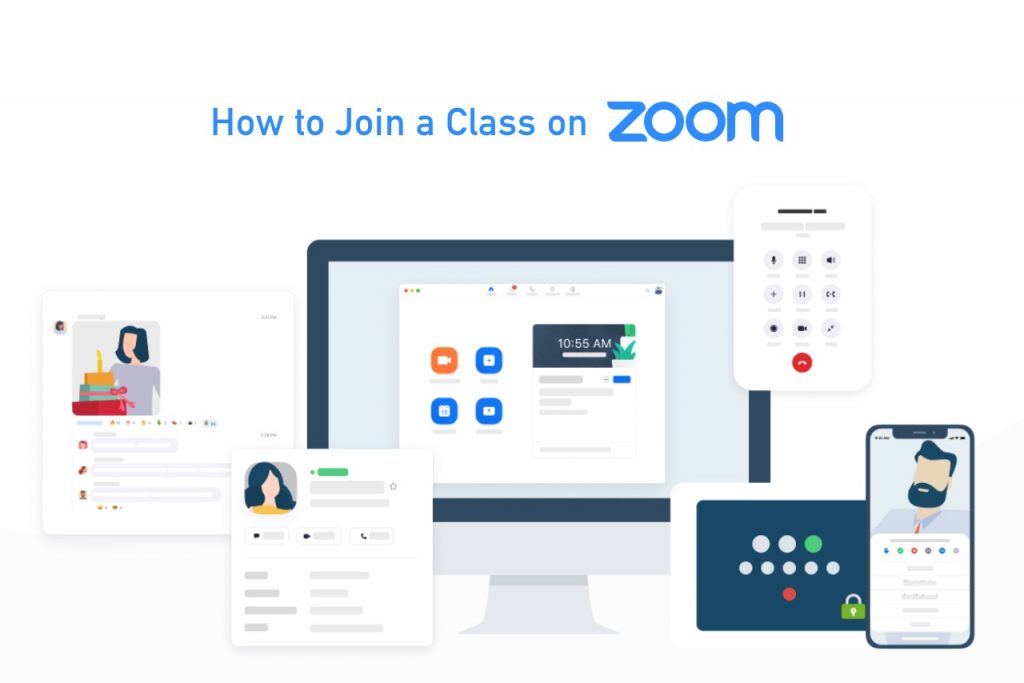
How to Join a Class on Zoom?
How to use Zoom? Hereunder, are the step-by-step process of how to use Zoom meeting app on Desktop/Laptop:
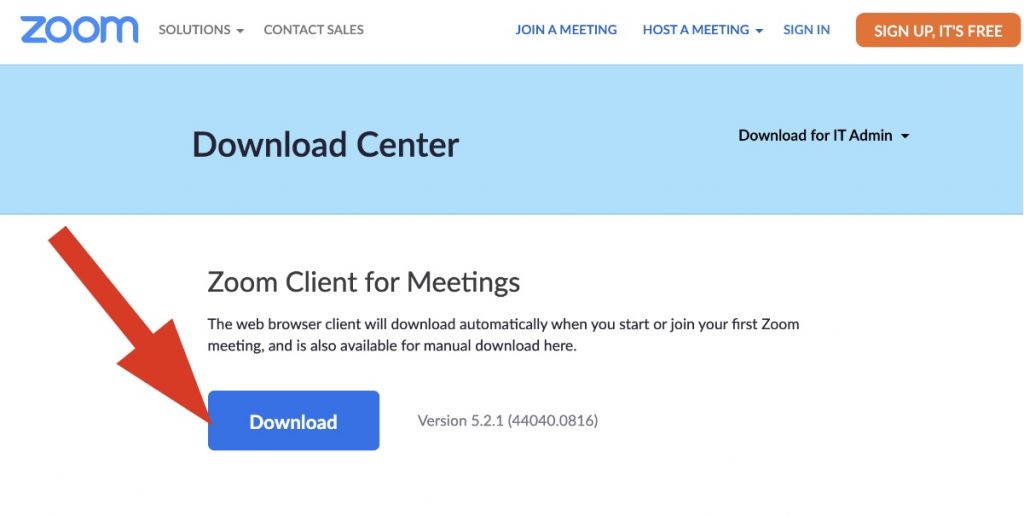
Download the Zoom Client for Meetings
Before joining a Zoom meeting on a computer, you need to download the app “Zoom client for meetings” as pre-downloading the app will save time. Always download the Zoom app from the official website zoom.us.
Ways to Join a Class on Zoom
There are many ways to join a Zoom meeting.
Use the Zoom App on Desktop
I have created this tutorial on macOS, but the process is almost the same on Windows OS.
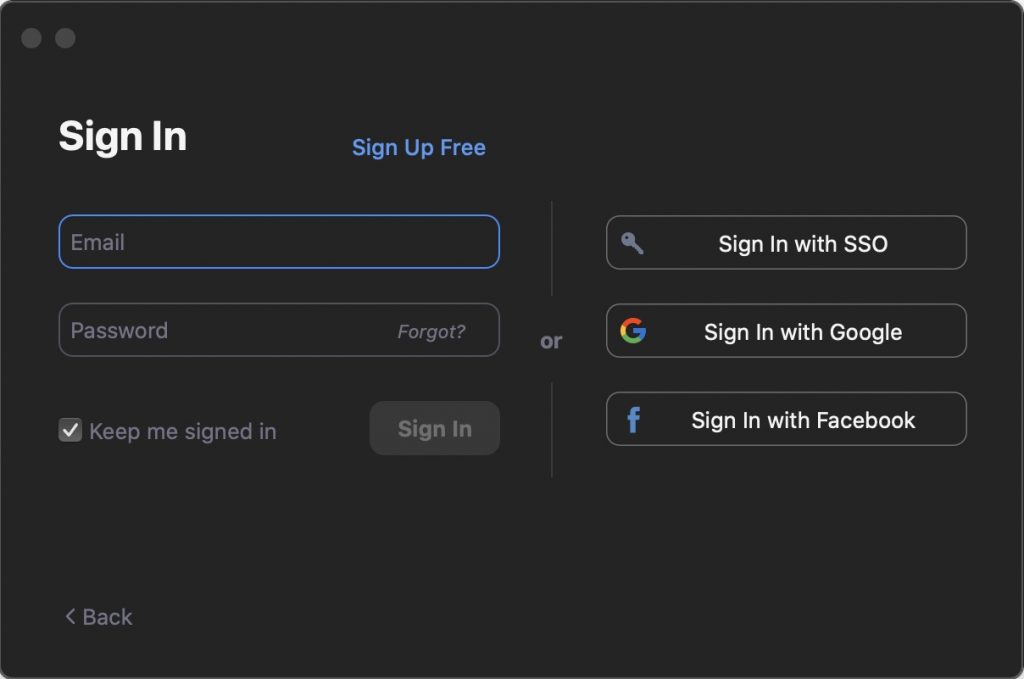
- Open the Zoom client to join a class on Zoom – Click the “Join a Meeting” button on the screen.
– You may “Sign In” (it is optional) into Zoom before click Join a meeting. Don’t worry, and your meeting will work without sign in. Sign Up Before you become eligible to sign in, you must have to click the button “sign up free” on the official website. We recommend “sign up” with Google because today, most of us have a Google account. It will help to sign in a single click, and you don’t have a need to remember an extra email password for Zoom sign in. Isn’t it a great thing? After completing the Sign Up process, you may sign in with your email and password, or you use social login like Google and Facebook.
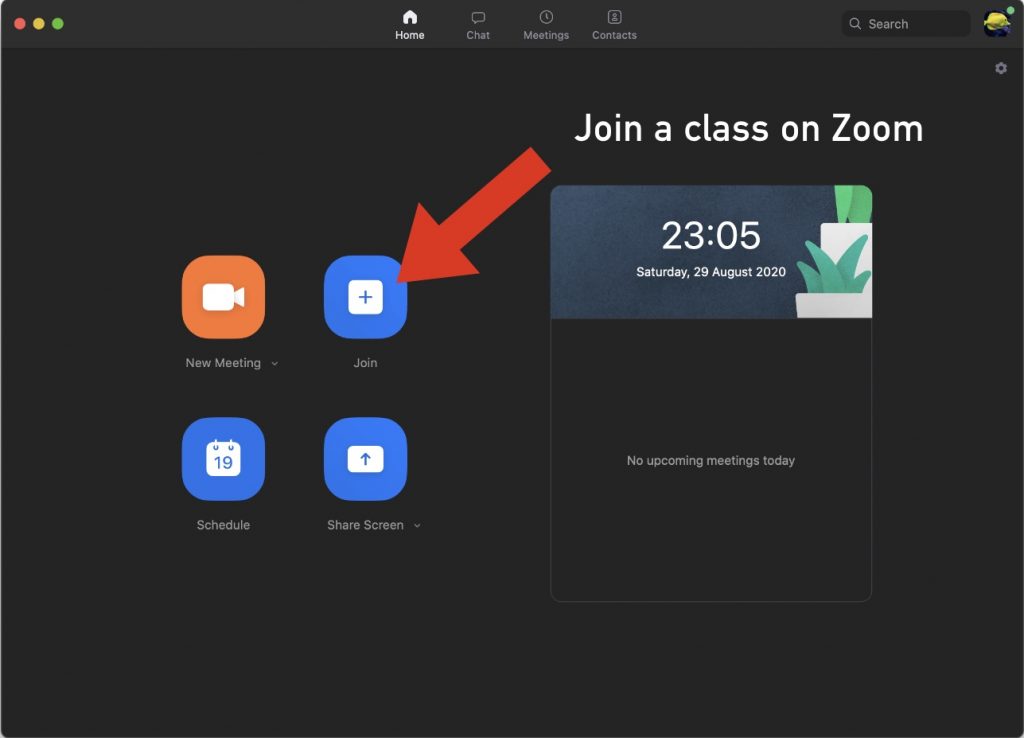
Zoom Dashboard after Sign In You can check the difference after completing the Sign-Up, you get this Zoom dashboard.
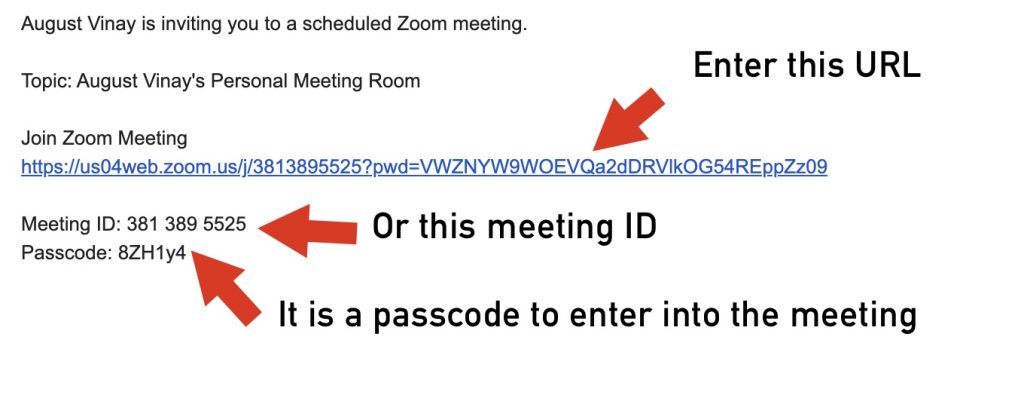
Sign In Details to Join a Class on Zoom – You teacher will send you a join Zoom meeting invite using email, WhatsApp, or some other way, e.g.,
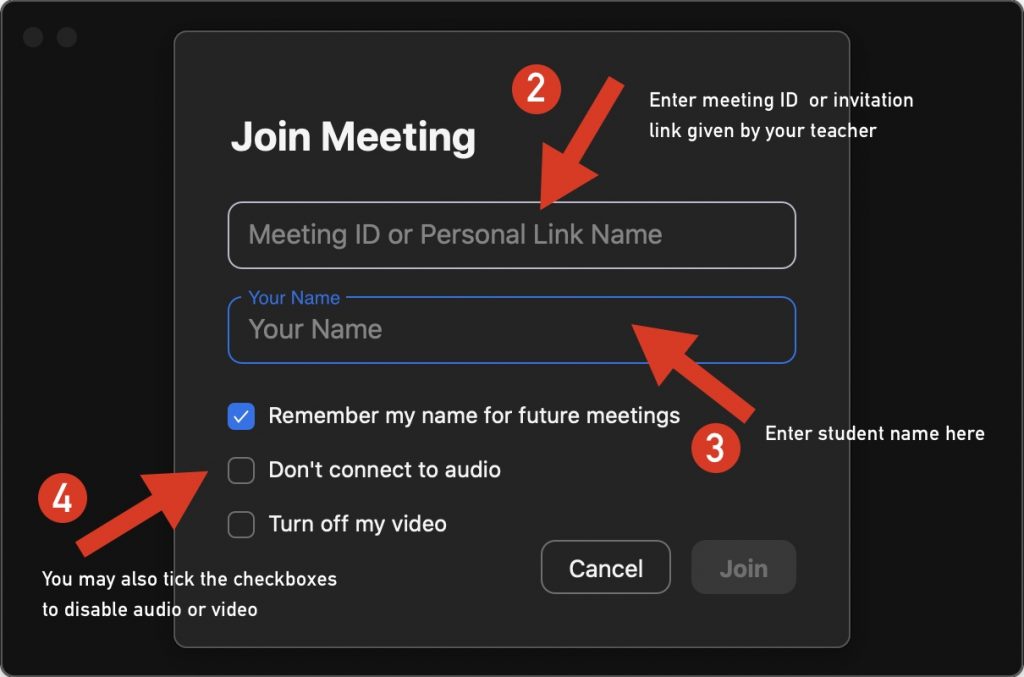
- Enter the Meeting ID or “join Zoom meeting” link as provided by your teacher.
- Then enter your name (prefer using the student’s name).
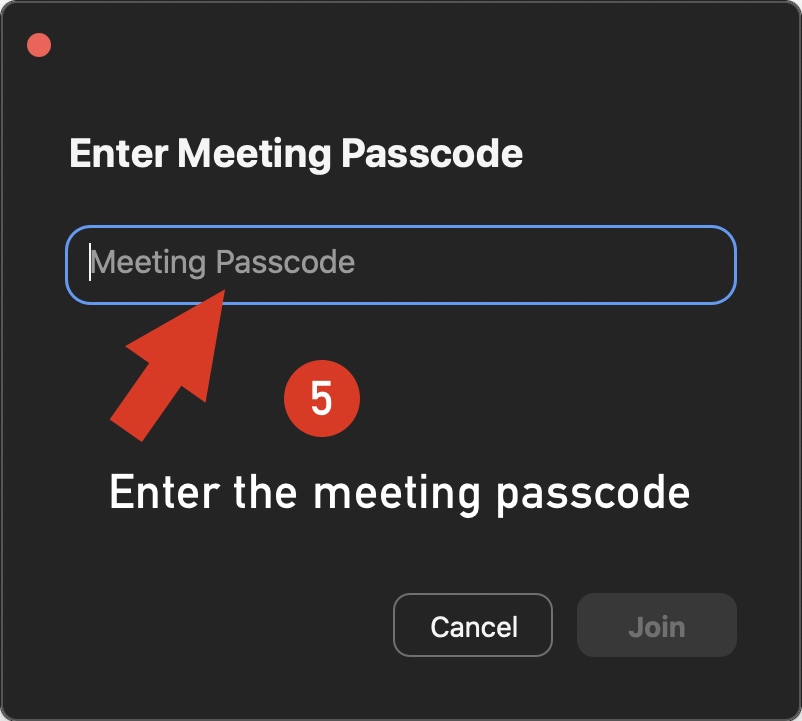
– I highly recommend entering the “Meeting ID” instead of a personal link name 4. You also get the option to disconnect audio and turn off video during the meeting. Leave the last two checkboxes unticked to connect audio and video during a meeting. 5. The next nag screen will ask for a meeting passcode, enter it, and click on the “Join” button.
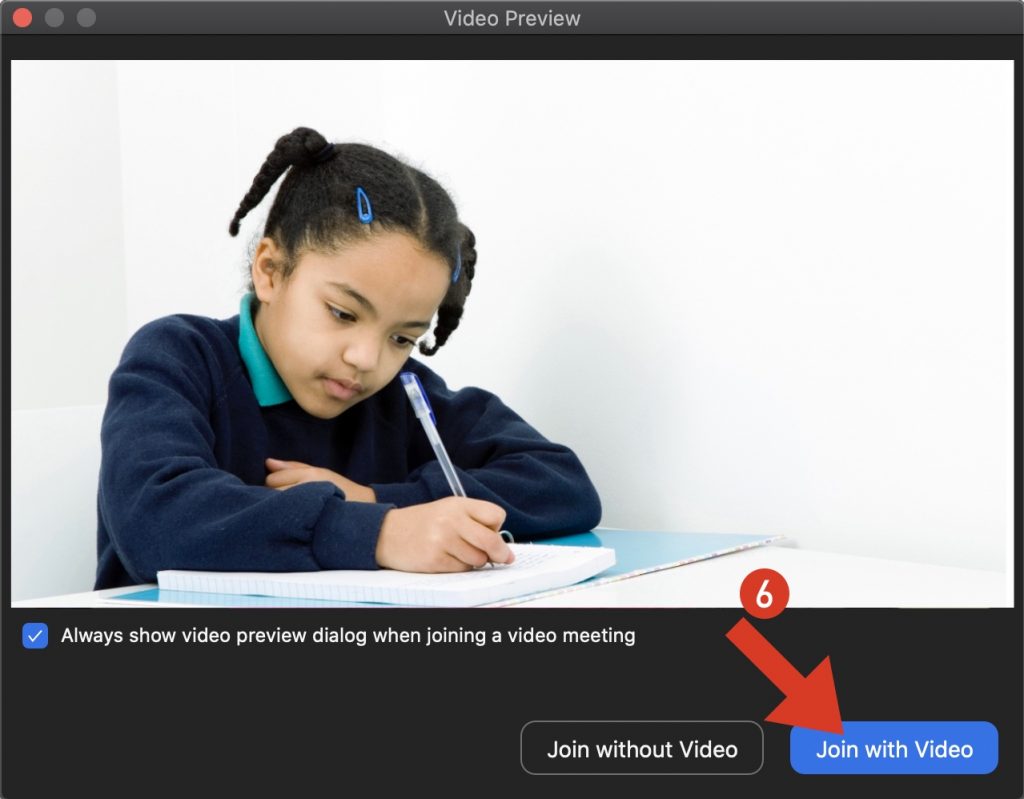
- Now, you will see the video preview before joining the Zoom meeting.
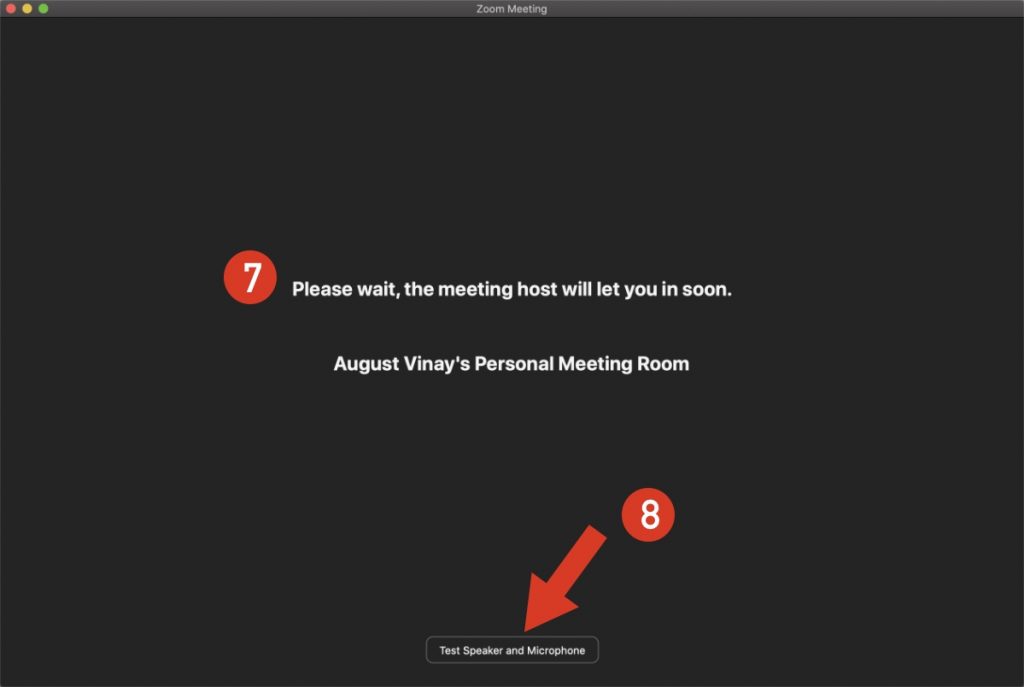
– There you get two options: “Join without Video” and “Join with Video”. Click on the “Join with Video” to join a class on Zoom. 7. You may need to wait for the meeting host to allow you in the meeting.
- On the same screen, you see the button “Test Speaker and Microphone”.
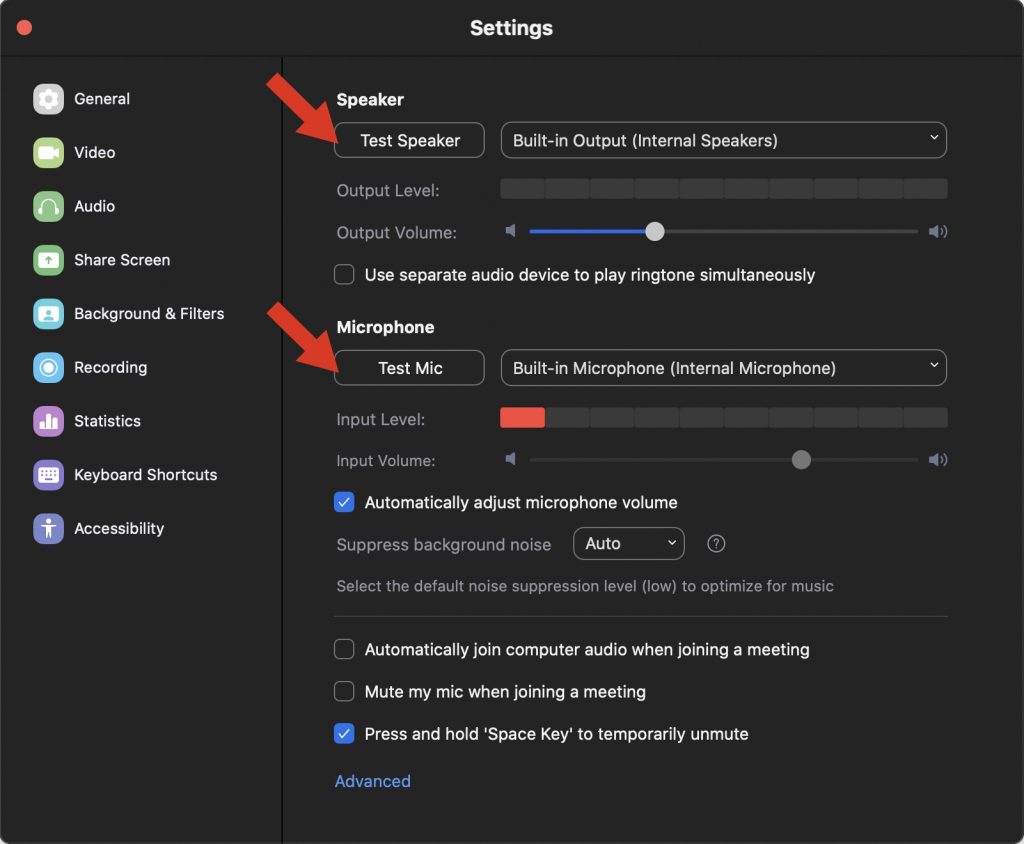
- After you click on the “Test Speaker and Microphone” button, then “Settings” nag will come up. Under the “Speaker” subheading, click the “Test Speaker” to test built or custom speakers, and under the “Microphone” subheading, click the “Test Mic” button to test a built-in microphone or another.
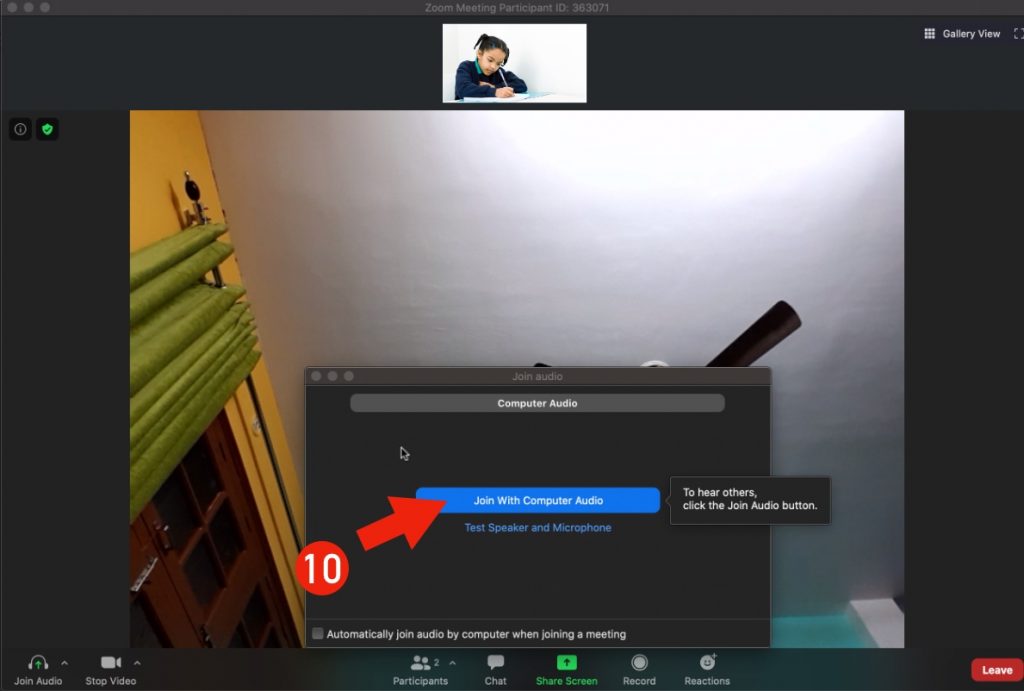
If all settings are perfect, then you are ready to join the meeting. Otherwise, you may need to take the help of a technical expert. You may check different YouTube videos to fix such problems. 10. When the host (teacher) will allow you in a meeting, you will see the following nag screen. Just click on the button “Join with Computer Audio” to join a class on zoom.
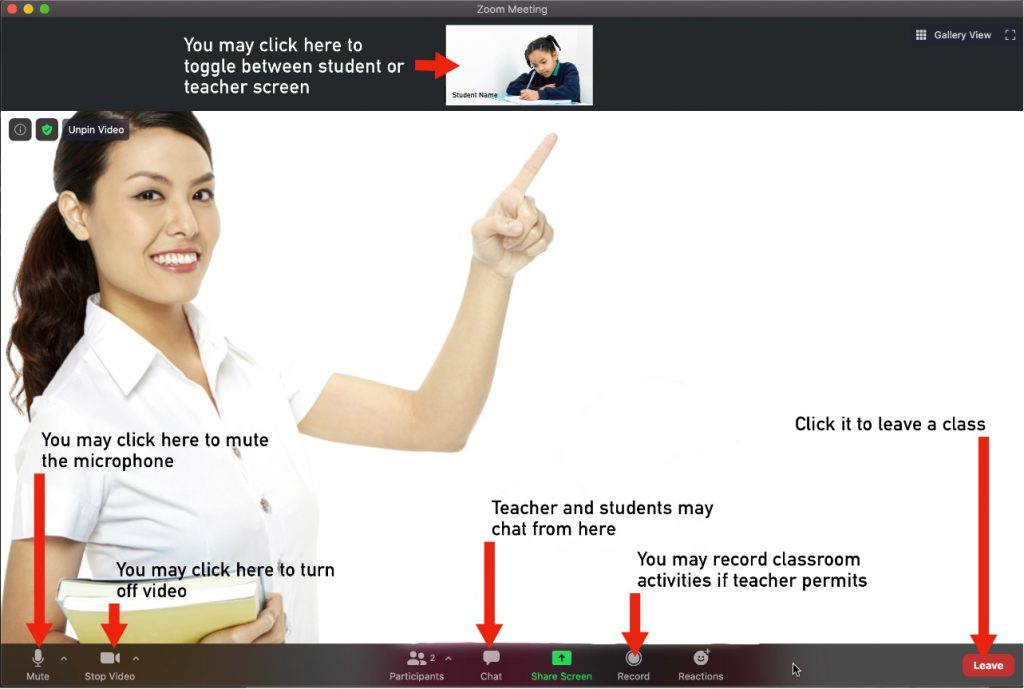
- After you join a class on Zoom, you need to know some important options given by Zoom clients for meetings.
– See, at the top of the screen, there is a running video of the student, or it may be of your teacher, but you may toggle between student and teacher screen. – On the left corner, you see two options to “Mute” and “Stop Video”. The “Mute” option will stop sending audio from your computer, and the “Stop Video” option will turn off the video. You may use them as per your requirement. – There is also a chat option for text conversion without interrupting the teacher and students. – You may record the class if the host (teacher) permits you. It is a perfect option to watch classroom activities later in time. – When class is over, you can click on the “Leave” button to leave the class.
Join Zoom Meeting Link
In your web browser, you have to type in “join.zoom.us“. Then enter your MEETING ID (or Personal Link Name) provided by the teacher. It will launch the already installed Zoom Client for meetings on your computer or smartphone. Otherwise, it will download the installer to install the Zoom on your desktop. If so, then you must install the Zoom client for meetings to join a meeting with your teacher. Repeat the above steps to join a class on Zoom with or without sign in. I hope this tutorial will be helpful to you. Additional Reading: How to Join Zoom Meeting on Android for Online Classes?
Advantages of Using Zoom on Desktop
1. Big screen size
The first and foremost advantage of zoom is better to screen resolution, which means on a desktop computer or laptop, students can have better visibility and clarity of the topics and subject-matter.
2. Less strain on eyes
Using Zoom via desktop does not affect our eyes so much because you can maintain a proper distance from the screen.
3. Support a variety of documents
The next advantage of using Zoom Client for meetings on the desktop is that you can enjoy a wide variety of features on your desktop instead of on phones. Sometimes, it happens that a particular video or PPT is not supported on the phone, but it is supported on desktop.
4. Less screen time
Another advantage of using the Zoom meeting app on a desktop is that children will only spend their screen time as needed for a class because they are not aware of the other features of the desktop, which will limit their screen time and not harm their eyesight.
5. More thumbnails
The last advantage of using the Zoom meeting app on a desktop is that it allows up to 49 thumbnails at once in the gallery view.
Disadvantages of Using Zoom on Desktop
There are certain disadvantages also of using Zoom app on desktop:-
1. Desktop or laptop is costly
It is not cost-effective and affordable, which means that there are many parents who cannot afford a desktop or laptop due to its high price. So, they would opt for a mobile phone instead of a laptop or desktop.
2. Mobility matters
A desktop is not handy or portable. Imagine if you are out somewhere, and due to some reason you are late and cannot reach home on time for class, so you can join a meeting then and there only through mobile devices like laptop, tablet, or smartphone rather than desktop.
3. Lack of rear camera
Another disadvantage of using the Zoom app on a desktop or laptop is that you cannot turn on the back camera on it. You have to study or teach with the front camera mode every time.
4. Built-in Wi-Fi is required
Network issue is also one of the major drawbacks of using Zoom app on the desktop. Many families might not be having strong network connections or Wi-Fi, or the people living in remote areas also can face the same problem because, without Wi-Fi, it is challenging to use Zoom on desktop. Not every parent can afford Wi-Fi.
5. Compromised audio and video quality
Another disadvantage of using the Zoom app on desktop or laptop is every laptop or desktop does not offer good voice quality or audio. You have to connect it with the external speakers and microphones, which is also another problem as it might not be available in all families. These were certain advantages and disadvantages of using the Zoom meeting app on a desktop or laptop. Co-author: Manpreet Kaur, BEd, (Educator @ Seth MR Jaipuria School)